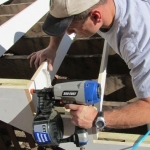
Always control your current brad nailer within both hands. Singular utilizes the nailer for fixing timber in order to timber. Do not attempt to help fix for you to thin, weak edges or even more than the existing fixing. NEVER tamper or even modify just about any security offers with this equipment, these are generally there for the safety. Regardless of whether your current stability process fails, stop along with, contact your local HSS employ shop with regard to advice. Press your nailer evenly on your current fixing surface of the protective tip fully depressed, subsequently squeeze your own trigger to help fire a great nail.
Release the trigger along with removing your own nailer. Right after firing your own tool, you will hear ones sound of an electric motor, it is quite normal along with people haven’t asked to wait with regard to the idea for you to stop earlier producing ones than fixing. The suited fixing would always be on the top of a nail flush with the timber surface, but just as timber density will vary you have to adjust one’s depth regarding penetration. To help adjust the strip nailer, to begin by removing your own battery. Loosen ones 3 allen screws with the top of a security principle as well as either slide one guideline forward to reduce penetration or maybe back to increase.
Written your own Allen screws, build a test fixing and also readjust in the same way necessary. In order to adjust your current brad nailer, first of all remove your battery. There can be a depth adjustment nut to the left-hand side of the safety measures tip (as viewed with the rear of a tool, watch illustration). Turn your own nut either anticlockwise to be able to reduce penetration or maybe clockwise to increase. Make a test fixing as well as readjust equally necessary.
I am trying to explain about it more..
A title this unexpectedly shoots out the side of your project can be guaranteed for you to make anyone curse, especial, whether or not one finger happens to help become for the way. Blowout will be instantaneous in addition to dangerous. 18 gauge brads are generally therefore darn thin, they get a tendency to deflect when they encounter something hard, to be a knot. Throughout many cases, a blowout will be caused by the wood’s uneven cellular structure, consequently you might get ways for you to limit their occurrence.
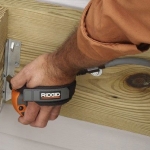
- Tient ones brad correct,. whether or not that you are attaching a face frame, hold your nailer consequently the handle is actually perpendicular to the outside edge (not parallel, in the same way available on the photo). This position ones brads wedge-shaped concept so virtually any side-to-side deflection is usually contained in the wood.
- Fire in your own face frame’s growth rings. Transaction your current end grain. Regardless of whether your own thing angle parallels your current growth rings, your current bard will probably ship, deflect off your own tricky latewood.
- Increase your current air pressure when people nail in difficult wood. Simply as being a part that falls off your current line whenever that loses speed, a great brad driven shaft, can be extra like, in order to deflect.
- Protect yourself even whenever you carry preventative safety measures, precautions, the blowout may still occur. Always wear eye protection and also keep your fingers very well away because of the brads path.
How to maintain brad nailer
Again I’d like to repeat that running your air tool at the correct air pressure and lubricating the tool with air tool oil is good basic practise (If you do not have an inline oiler just add a few drops via the air line fitting on the tool – when connected to the air line the pressure will dissipate the oil around the tool via Trigger Valve/Cylinder/Piston Driver Assy and Head Valve). Air pressure should be set at approx. 90psi (6.21 bar) and try to keep the air as dry as possible – good practise is to drain the compressor cylinder daily.

The list of the basic parts of the Brad Nailer as follows:
- Main Nailer Body – Include the operating Trigger Valve, Cylinder (6) Piston Driver Assy (5) and Bumper (7)
- Head – This part is often associated with 4 bolts but can also be inserted into the Main Body. The head is also the housing for the Head Valve.
- Head Valve Spring – Retains Head Valve against Cylinder after operating cycle.
- Head Valve – Seals against the Cylinder prior to operation cycle.
- Piston Driver Assy – Driving the Brad Nail from the Feed Magazine into the work surface.
- Cylinder – The housing that the Piston Driver Assy cycles within.
- Bumper – At the base of the Cylinder absorbing the impact from the Piston Driver Assy at the base of its cycle.

When servicing this type of tool or any tool for that matter I want to work on a nice clean and tidy surface.
A tidy surface reduces the risk of losing any small item parts …….it always amazes me how that little spring always flys into the abyss of the workshop to be never found again ….
Clean and check all parts, especially the condition of Damper and O Rings. Ensure the Head Valve operates smoothly against the Spring without any sticking movements.
When inspecting the Piston Driver Assy check the contact point with the Brad Nail is flat and not rounded. This could over time become rounded causing the drivers to pass through the top of Brad Nail and fastener proud leave work surface. This can be ground flat again with a grinder being careful not to take too much off. If not replaced fully assembled.
Finally, although not listed, always inspect the magazine and Feed Assy – Feeder Shoe and Spring should be in good condition and be able to move freely.


Speak Your Mind