Features You Need To Know About Brad Nailers

If you’re such as me, there’s a chance you’re a veteran of the manual method of hammering up trim. If you’re cleverer compared to me, you’ve got absolutely bypassed the manual method and started at the most effective method of trimming your home.
What exactly is:
It truly is a good electrically run nailer that will fire 18 gauge brads (no staples). Both cordless or corded, this tool loads an air compression chamber through an electric charge. The energy which launches the brad comes from the chamber discharging. Brads are usually 18 gauge and can be as long as 2″. These kinds of tools using corded versions currently cheaper.
What it truly is intended for:
Ultimately, you’ll apply it for:
- Trim around interior windows and doors
- Installing quarter-round and baseboards
- Crown molding
- Cabinet and furniture work
It isn’t for tacking up insulation, plastic sheeting, or maybe thin product such as veneer. With the, use a stapler/brad gun. These fire two-pronged staples, that are necessary for ultra-thin materials to prevent them from tearing through. Additionally, they fire single-prong brads up to 1/2″, more or less.
It isn’t for building work for instance framing a house or nailing a 2×4. For this, you want a pneumatic framing nailer using either a stick or coil magazine capable of firing 1 1/2″ to 3 1/2″ nails.
Key Features:
- Air Pressure Dial: Adjusts the amount of air that is expelled when you press the trigger. More air pressure means deeper brads; less pressure means higher brads.
- Depth Gauge: Adjusts distance of the nailer from your work material.
- Magazine: Brad strips are loaded into this section.
- Magazine Lock: Press this to load the gun. Don’t confuse this with another lock at the other end of the magazine which is used only to clear the magazine of jammed brads.
Top 3 Best Electric Brad Nailers
These are top 3 best electric brad nailers comparison table which will help you to make the best choice for your woodworking projects easily:
| Brad Nailer | Power Source | Magazine Capacity | Weight | Editor's Rating | Price |
|---|---|---|---|---|---|
Ryobi P320 Airstrike One+ Lithium-Ion Cordless Brad Nailer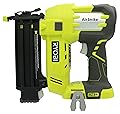 | Battery-Powered | 105 Nails | 6 lbs |  (4.6 / 5) (4.6 / 5) | See on Amazon |
BOSTITCH BTFP12233 Smart Pt. 18Ga Brad Nailer Kit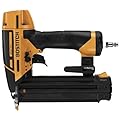 | Corded-Electric | 100 Nails | 5.16 lbs | (4.6 / 5) | See on Amazon |
Makita AF505N Brad Nailer, 2-Inch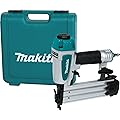 | Corded-Electric | 100 Nails | 3.0 lbs |  (4.5 / 5) (4.5 / 5) | See on Amazon |
Related posts:
How to Load an Electric Brad Nailer
All brad nailers will probably load in a different way. But some hints, common to all nailers:
Brad Length
Ensure that your brads are from the accurate range of length. The tool revealed here usually takes brads between 5/8" and 2".
Naturally, whatever higher than 2" just will never fit. But what about brads shorter than lower end of the range? Though they will often easily fit in the magazine, they'll not fire correctly. They'll probably jam by the end with the magazine.
Gauge, or the thickness of the brads, is actually vitally important. What is the difference in between 16- and 18-gauge brads? Lots. The truth is, a entire tool's difference.
Once you get up to 16-gauge brads (lower gauge number show thicker brads), you may need a completely different nailer to use them.
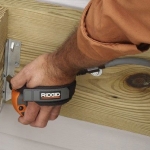
Continuous Strips
Handle the brad strip carefully so that it does not break apart. No, it's not absolutely vital that the strip remain continuous; you can piece together shorter lengths, as shown here, just like you would with an office stapler. But you can ensure smoother brad feeding operations if the strip remains unbroken.
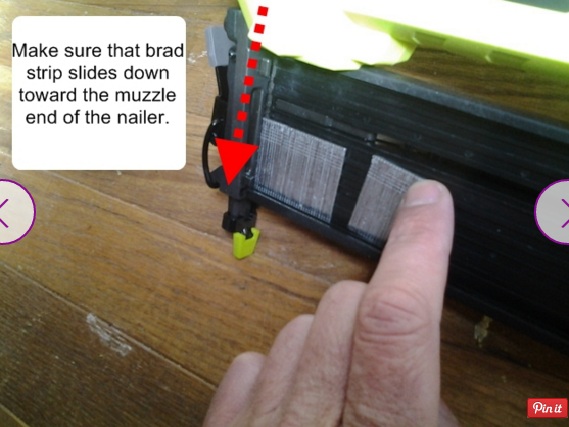
Push Forward
Typically, you will slide the brad strip as far forward (in the direction of the nailer's firing end).
Slide Magazine Shut With Care
It's tempting to vigorously slap the magazine shut. And also, without a doubt, you will have to slide it up with some amount of force to make it lock into place. But too much force may cause the brad strip to fall out of place (especially with non-continuous strips) and jam the nailer.
Position and Depth Adjustment

And here is the location where the rubber meets the road: shooting the nailer.
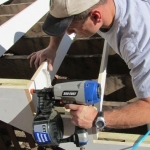
Position on the Work Piece
First, discover the work piece contact point on the "muzzle" end of your nailer. This contact point depresses when you push the nailer against your work piece. For safety reasons, the gun cannot fire if the contact point is not depressed.
Keep in mind that the brad fires slightly apart from the contact point. In the accompanying picture, realize that the brad fires regarding 1/4" higher than the contact point--missing the trim entirely.
Perfect Depth
What is actually the perfect depth? Thoughts differ, although I could sum up my sensations: At level with the surface of the work material or sunk, but sunk shallow enough to still see the brad head glinting.. Why don't we bust it down:
- Protruding: Worst. This is doubly bad, because if you try to hammer the brad the rest of the way in, you'll bend the brad over. Remember, this is thin wire, not a finish nail. Not only that, you'll ding your work piece. Avoid at all costs.
- Sunk: Better. Brads sunk far below the surface won't sufficiently hold the material in place, especially if the material is a mushy substance like MDF. If the head is sunk below the surface, yet you can still see the shiny head, it's fine.
- Level: Best. Brad heads are smooth and small. If you place the head at level with the work surface, the head will be invisible after painting. You did intend to paint, didn't you? Also, the brad heads will hold the material firmly in place.
If the material is wood in addition to you want to keep an organic and natural finish, your just option is to sink it and apply wood filler.
The way to Adjust Depth
Two features control depth: air pressure dial and depth gauge. It can be tricky balancing the two features, since they sometimes work counter to each other.
Gather scrap materials that are the same as your intended work piece. This can be crucial, due to the materials get different thickness and density, that has an effect on the depth of the brad.
Begin with the air pressure gauge. Adjust it to a middle point between high and low. Subsequent, modify the depth gauge to a middle position. Check fire a brad.
If the brad protrudes, adjust air pressure to a higher-level. If sunk too far, simplicity, high on the air pressure. Use your air pressure as your primary means of adjusting depth.
Once you are in the general range, you can use the depth gauge to fine-tune the depth.


Thanks this is a amazing post to know about using nail gun..
http://nailgun.edublogs.org/